Flat Weave Car
by Ralph Dewey
The BalloonHQ Challenge for this month is a car.
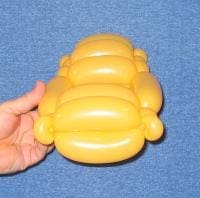
I love the “flat weave” balloon technique. It’s so versatile for making flat objects. As an example, I’ll show you how to make a car that might remind you of the Flintstone automobile. It requires two goldenrod #260 balloons, two blue #160 balloons and four red #321 Bee Body balloons.
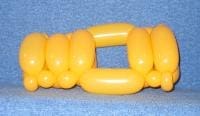
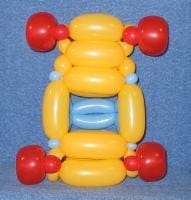
Let’s start by making the chassis of the car. Inflate both of the #260 balloons fully except for about 4 inches, then tie off their nozzles. Twist off a 1/2″ bubble on both balloons and make them into ear twists. Twist off a 4″ bubble on each balloon. Overlap them and twist-connect them together.
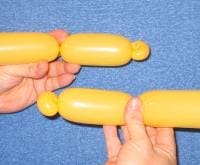
Since flat weaving is like making rungs on a ladder, I call the two 4″ bubbles the first rung. (By the way, some people like to call this technique the “Ladder Weave”.) To make the second rung, twist off a 1/2″ bubble and a 4″ bubble on both balloons. Lay both of the 4″ bubbles along side each other, then carefully rotate them (causing them to trade places) so that they lock in place.
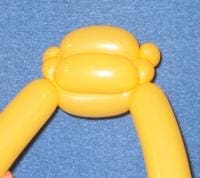
Make the third rung in the same manner as you did for the second rung.
To make the car doors and an empty area for the driver, twist off two 4″ bubbles on both balloons. Overlap the two 4″ bubbles made last and rotate them (trade places) to lock them in place. That will complete the fourth rung.
Make rung 5 in the same way as you did the first three rungs.
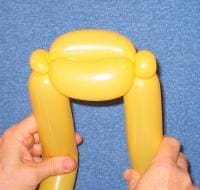
To finish the chassis of the car, twist off a 1/2″ bubble on both balloons and ear twist them. Cut off and discard any excess balloon.
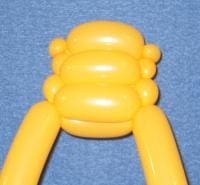
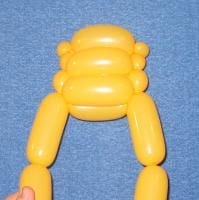
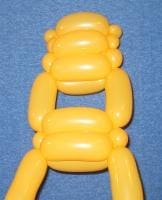
To make the roof of the car, take two #160 balloons and inflate both of them to about 18″. Then tie off their nozzles. Take the first one and twist off a 1/2″ bubble and ear twist it. Then twist off a 5″ bubble and two 4″ bubbles. Fold the 4″ bubble and twist-connect them together. Twist a 1/2″ bubble a 5″ bubble and a 1/2″ bubble. Ear twist both 1/2″ bubbles. Cut off and discard any remaining balloon.
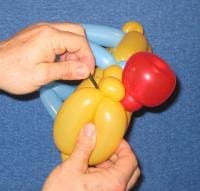
Take the second #160 and twist off a 1/2″ bubble and ear twist it. Then twist off a 5″ bubble and a 1/2″ bubble. Ear twist the 1/2″ bubble. Connect it to the twist of the two 4″ bubbles on the first #160 balloon. Twist off a 5″ bubble and a 1/2″ bubble. Ear twist the 1/2″ bubble. Cut off and discard the remaining balloons. With the roof completed, the next step is to attach it to the car chassis.

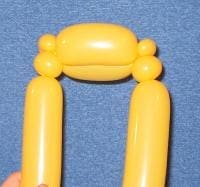
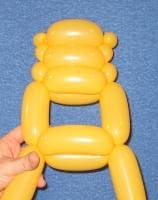
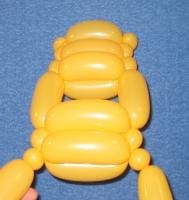
Attach the 1/2″ ear twists (the roof supports) at both ends of the car door bubbles. See the photos for details.
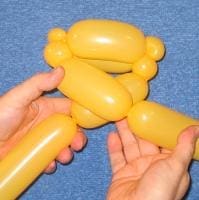
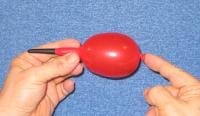
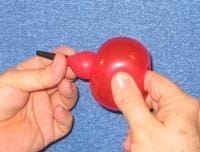
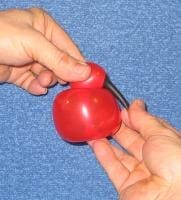
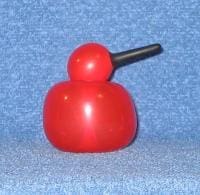
Now make the tires. Use four #321 Bee Body balloons for the tires. To make a tire, inflate a red #321 to about 3″ and tie off the nozzle. Make an apple twist on the knotted end so as to leave a 1″ bubble on the nipple end. Pull the nipple end to one side and squeeze the 1″ bubble. This will cause the nipple end of the #321 to stick out to one side. Use the nipple end to tie the tire in place. See the photos for exact placement. Make the other three tires in the same way and tie them in place as well.
Now your car is completed.
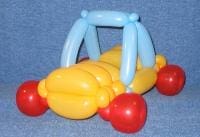

Of course you can include things like headlights, taillights, fog lights, whip antenna, a driver and other enhancements if you want to fancy it up a bit.
