
FANTASY FLOWERS ARE EASIER THAN YOU THINK..
by Chris Horne
I do a lot of fantasy flowers and related items. I use them in wedding work,
centrepieces, deliveries and sculptures. I KNOW that they are profitable,
and I also know that they are almost guaranteed to cause a stir when the
recipient or the client sees them. What I didn’t quite expect was the
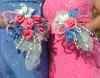
reaction my class of boutonnieres, corsages and wearable balloon art at IBAC
this year would generate! It seems that balloon professionals the world over
are as fascinated by these things as I am, and were eager to see how the
techniques could be used to create items that could be sold for all manner
of social events. Weddings, proms and parties of all descriptions provide a
market for balloon wearables, and it was my pleasure to show a few of my
designs and ideas for people to take away and offer to their clients.
The postings to BHQ after IBAC served to show me that although many people
who attended the class at IBAC were able to benefit, there were far more out
there that hadn’t been able, for whatever reason, to attend. So, while it is
far easier to demonstrate the techniques than to describe them, I have
resolved to try and explain a few of the more important methods and
techniques here, and hope that it will encourage you all to try out this
fascinating area of balloon art!
 The first thing you need to realise
is that in order to create really good
looking pieces, you have to throw out one of the most important pieces of
floristry advice. In floristry, when creating a corsage, you will use the
thinnest and lightest wire you can get away with in order to keep your
design as light as possible. When using the fantasy flower techniques to
create a corsage, you do almost the opposite, and use very strong and heavy
wires. If you don’t, your petals simply will not hold their shape. Use a
wire that is strong enough to hold it’s shape when the balloon is stretched
tightly over it. As most of my designs are created from 5″ balloons, I find
that an 18 or 16 gauge wire (certainly no thinner) is the best. (That’s
another thing. If you’re not a florist, you probably won’t be aware that the
smaller the gauge, the thicker the wire! So a 16 is heavier than an 18…
very confusing!)
A second, and VERY important point is that you need to keep the bulk of each
petal to a minimum so that the finished piece is as elegant as possible,
without a huge lump of stuff behind it. One way of doing this is to remove
all of the neck of the balloon BEFORE you start. Cut the whole of the neck
off, just at the point where it begins to flare out into the body of the
balloon.
So, to make a petal, you will take your heavy wire, and bend it into a
hairpin shape. (If you want a “pointy” petal, then put a sharp bend in the
wire. If you want a more rounded petal, then put a more rounded bend in the
wire. This is because once florist’s wire has been bent sharply, it’s almost
impossible to straighten it again!) Then, insert the wire into the balloon,
bent bit first. (!) Grip the bend in the wire through the tip of the balloon
with the forefinger and thumb of your left hand, and use your right finger
and thumb to stretch the balloon down the wire to the desired length. Now,
grip tightly with your right hand to stop the balloon sliding back up the
wire, and move your left finger and thumb next to your right. (got that?)
Grip tightly with your left finger and thumb. Your right hand is now free to
bind the balloon to the wire very tightly using three or four turns of thin
binding wire. Once secure, you can let go and the balloon will remain
stretched over the wire. Cut off the thin binding wire to leave two “tails”
about 3″ long. Then cut off all the excess heavy wire and latex from below
the binding point. You could now tape this with florist tape to neaten it
all up.

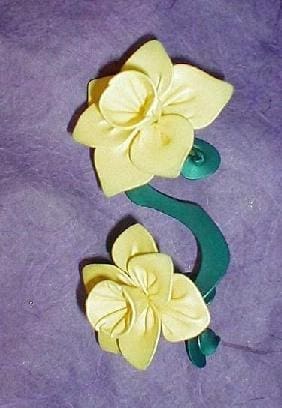
That’s your petal. To shape it, grasp the two pieces of wire that are inside
the balloon, one in each hand, and pull them apart gently, to form the shape
of the petal. curve and shape as necessary.
Then it’s quite simple – just make as many petals as you need for your
chosen flower, and assemble them. This is best done by adding the petals one
at a time, and binding them in place with more fine binding wire when you
have three or four in place. It’s very difficult to hold all the petals in
place at once before you bind them, so make life easier for yourself and do
them in small groups. Try to keep all the bindings at one level so that the
centre of the flower doesn’t spiral out of control and resemble a cabbage
that has “bolted” or gone to seed! When all petals are in place, go round a
couple more times with the binding wire for security, trim out any
unnecessary or unwanted wires, then tape with floral tape to neaten it all
up – and voila! A beautiful flower. Any final tweaking curving and bending
of the petals can now be done for perfect results
Leaves can be made in the same way, and you can add all sorts of special
touches by using other balloons – I find one of the best is to take one of
your strong wires, bend a TINY loop in each end so that the sharp points are
completely hidden, and insert the entire thing into a 160Q or 260Q. Stretch
the balloon right over the wire and beyond, and tie off so the balloon stays
tightly stretched over the wire. this can now be added to your flower and
curled and spiralled into all sorts of interesting shapes to give rhythm and
variety to your design.
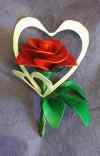
This kind of work is fun. And it can be very profitable if you work at your
techniques so that you can do it fairly quickly. You can see many examples
of corsages and other “wearables” in
my portfolio on Balloon HQ – and most of these took less than 15 minutes to create.
Go on – have fun! For more information, there is an excellent book by Margie
Padgitt called “NEW! Fantasy balloon flowers”.
Christopher Horne CBA,
Northampton,
England.