A Miniature Gazebo
Hello everyone. I hope your holiday season was profitable and fun. Now that Valentine’s Day and Spring are just around the corner, I created a lovely gazebo for table decorations, for a special birthday gift and of course for wedding decor.
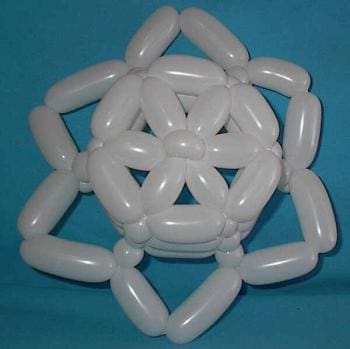
The top of the gazebo is a woven hat. The uprights are easy pinch twist bubble combinations. Consistent bubble size is the key to success. I recommend using a ruler to measure the bubbles.
Materials: 11 white 160s, base, ruler, scissors, Glue Dots or other adhesive.
Note: For those of you familiar with 6 balloon weaving, the first row vertical bubbles are 2″ connected with 2 1/2″ horizontal bubbles. The second row is 1/2″ vertical bubbles connected with 2 1/2″ horizontal bubbles. The third row is 1/2″ vertical bubbles with 2 1/2″ horizontal bubbles. The fourth row is 1/2″ vertical bubbles with 5″ horizontal bubbles. Deflate each of the 6 balloons, tie a knot at the end of the inflated section, wrap the balloon around a bubble to secure but do not trim. Twist each of the 5″ bubbles at the midpoint. See Steps 6 – 8 for additional directions.
Step 1: Inflate 6 white 160s leaving about 6″ uninflated. Tie 2 balloons togther at the knot. Repeat for 2 more pair. Twist the 3 pair together at the knots. Twist a 1/2″ pinch twist in two of the balloons. Position one of the pinch twists on top and the other on the bottom.
Step 2: In one of the balloons, twist a 2″ bubble and a 2-1/2″ bubble. Twist a 2″ bubble in the 2nd balloon. Connect the 2nd bubble in the first balloon to the 2″ bubble in the 2nd balloon.
Step 3: Twist a 2-1/2″ bubble in the 2nd balloons and a 2″ bubble in the 3rd balloon. Connect the bubble in the 2nd balloon to the bubble in the 3rd balloon. Repeat with the 4th and 5th balloons. Twist a 2-1/2″ bubble in the 6th balloon, pull the balloon through the triangle in the 1st balloon. This completes the second row.
Step 4: For the third row, twist a 1/2″ bubble in the first balloon, followed by a 2-1/2″ bubble. Twist a 1/2″ bubble in the 2nd balloon. Connect the 2-1/2″ bubble to the 1/2″ bubble in the 2nd balloon. Continue making 1/2″ vertical bubbles and 2 1/2″ horizontal bubbles. This completes the 3rd row. Twist another row using the same dimensions.
Step 5: For the fourth row, twist 1/2″ vertical bubbles and 5″ horizontal bubbles. Twist each 5″ bubble at the midpoint. Deflate each of the 6 balloons, tie a knot at the end of the inflated section, wrap the balloon around a bubble to secure but do not trim.

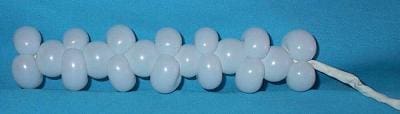
Step 6: For the uprights, inflate a white 160 leaving about 6″ uninflated. Twist 2 1/2″ pinch twists and position them on opposite sides of the balloon. Twist a 1/2″ bubble followed by 2 1/2″ pinch twists. Continue until you have 7 sets of double pinch twists. Deflate the balloon, tie a knot at the end of the inflated balloon, wrap the balloon around the pinch twists to secure. Do knot trim.
Step 7: Repeat with the remaining 4 balloons. Tie each upright tightly to the top at a vertical section. Tie a second knot. (One vertical section does not have an upright.) Trim all excess balloons.
Step 8: I attached the uprights to a base (a glass dish) with Glue Dots. You can use a cake plate, tile or other base.
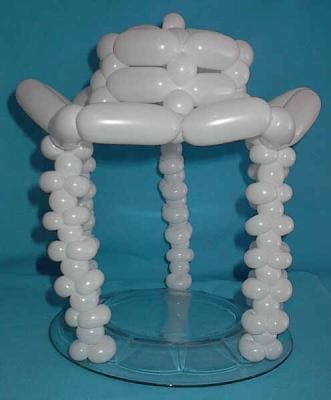
Optional Decorations: The sky is the limit to decorate your gazebo with flowers, tulle, garlands, feathers, birds. Have fun with this design – I’d love to see your finishing touches.
See you next month with something for Valentine’s Day.
Linda Berman