Everyone Loves a Hat
A balloon hat Primer
by Larry Moss
Balloon hats are one of the easiest and most enjoyable ways
of developing your creativity with twisty balloons. Easy, because there’s
no strict rule about what a balloon hat should look like, even to the
extent that a balloon hat doesn’t have to be worn entirely on the head. In
recent years the term “balloon hat” has come to mean just about any piece
of balloon clothing that has a headband of some sort. All that matters is
that your balloon hat can be worn. It doesn’t have to resemble anything.
In fact, free form creations often get greater reactions than
intricate sculptures.
The basics
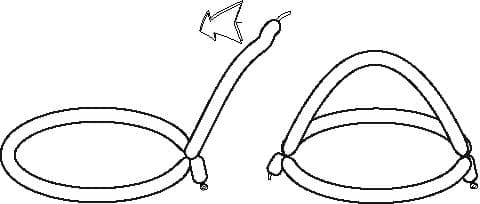
A few bases are used in the creation of most hats. The basic headband
is simply a balloon wrapped around the head, and then folded back over the
head to where it started. More interesting things are created with this
base by adding other components.
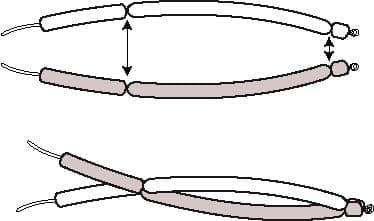
A basic two-balloon headband can be used for variety, or to help with especially large hat sizes.
In this head band, two balloons will be twisted together at the nozzle ends, and then brought
forward around the head and joined in the front.
Just left like this, the remainder of the balloons will flop around. Something needs to be
done with those ends. To form a more interesting, wearable hat, we’ll put a few finishing touches on
it. These include fold twists at the base of each of the remaining bubbles, and poodle tails at the
very ends of the balloons.
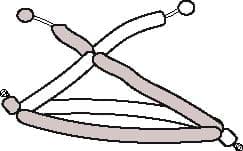
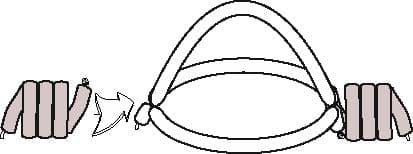
An overlap base is very similar to the previous two-balloon bases described. However it
offers very different possibilities later as we add things to the hats. This hat base starts with two
balloons that have their nozzles and tails pointed in opposite directions. Rather than line the two
up completely alongside one another, they are offset somewhat so the tail ends of the balloons
are extending free of the nozzles of their opposite balloon. Now we can join the two balloons at
the points near each nozzle.
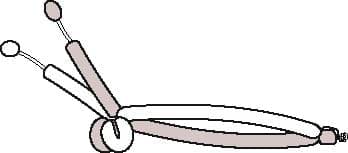
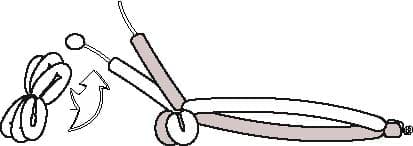
We can do something similar to what we did earlier with simple fold twists and poodle tails.
Just for variety, we’ll take a different approach. Take the remaining bubbles, and join them to
each other before forming the poodle tails. This forms a simple jester hat.
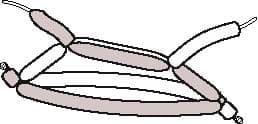
An alternate use of the overlap hat base involves a second overlap. After the balloons
are joined, the remaining bubbles can be brought back to overlap each other again.
As you can see, adding more balloons to the bases adds greater variety. The
one-balloon headband is a fine start to build on, but there are greater possibilities to explore with each of the
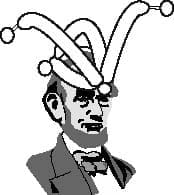
two balloon bases. The jester hat described doesn’t really capture the flavor of a real jester hat. If
our goal is to add more “bells” to the top of the hat to create something that comes closer to what
we picture as a proper jester hat, we’ll need additional balloons.
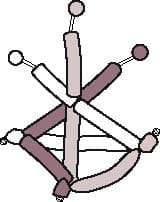
This three-balloon base is created by joining the balloons about a third of the way down
from the uninflated ends and then folding the balloons to join adjacent bubbles, and lastly, forming
the headband.
Embellishing the basic hats
Embellishing the hat is where you really get to be creative. Make whatever comes to mind
and attach it to a hat. Fully inflated balloons can just extend from the hat. Flowers can be attached
to
loose ends. Spirals can be attached to add different looks. The important thing is to have fun.
Here we have a simple two-balloon headband. By sliding the flower onto the balloon at
the base of the poodle tail we create a hat with a lot of motion. The flower is seen travelling around
as the wearer walks.
The hat below is constructed with just a one-balloon headband as the base. Two
spiralled balloons are attached to the sides. This hat can either be described as a safety hat since the
spiralled balloons look like springs (you can bounce off of walls with this one on), or as a Princess Leah
hat, in recognition of the rather strange hairdo that the princess has.
Where to go from here
The basics described here are really only intended to inspire further creations. As I
mentioned earlier, you can attach any figure you want to the top of a hat. Animals are sometimes worn on hats.
For example, if the hat resembles a tree, a monkey can be placed inside of it. In fact,
limiting yourself to only straight balloons is also quite silly. Sometimes more festive creations can be
made by using decor techniques such as four-balloon clusters on the ends of the 260’s.
If you want to, you can take the next step of trying to turn the hat into something recognizable.
Animal masks are often a fun thing to create. Using very similar techniques to the ones
described here, full faces can be formed and draped over the front or back of a hat base. An angel or
butterfly can be made by extending a balloon down from the back of the hat and attaching wings.
The important thing to note is that anyone wearing a balloon hat knows just how silly even
one balloon looks. So once you’ve convinced them to wear a hat at all, they’ll be more than ready
for the wild creations you’ll end up with.